Sites.Selected | Graph API SharePoint Permission
SharePoint Site
Collection Permission
The "sites.selected" permission in Microsoft
Graph API allows you to grant an application access to specific SharePoint
sites instead of all SharePoint sites in the tenant.
Step1:
To Configure
"Sites.Selected" Permission in Azure App Registration
To use "sites.selected", you need to:
- Register
an App in Azure AD.
- Grant
"Sites.Selected" Permission to the app.
- Manually
Grant Access to the specific SharePoint site.
- Use
Microsoft Graph API or PowerShell to assign the required role
(Read/Write).
Step 1: Register an App in Azure AD
- Go
to Azure Portal → Azure Active Directory → App Registrations.
- Click
New registration.
- Provide
a name (e.g., SharePointAccessApp).
- Choose
Accounts in this organizational directory only.
- Click
Register.
Step 2: Add "Sites.Selected" API Permission
- Navigate
to API Permissions in the newly registered app.
- Click
Add a permission → Microsoft Graph.
- Select
Application Permissions.
- Search
for "Sites.Selected" and add it.
- Click
Grant admin consent for your organization.
🚨 Note: Unlike "Sites.FullControl.All",
the "Sites.Selected" permission does not automatically
grant access. You need to assign site-specific permissions manually.
Step 3: Grant App Access to a Specific SharePoint Site
Now, you need to manually assign the app permission to a specific
SharePoint site using Graph API.
Get SharePoint Site ID
Run the following API call to get the Site ID:
Example
https://qnsq.sharepoint.com/sites/OHSDeloitte/_api/site/id

Copy the Site ID from the response.
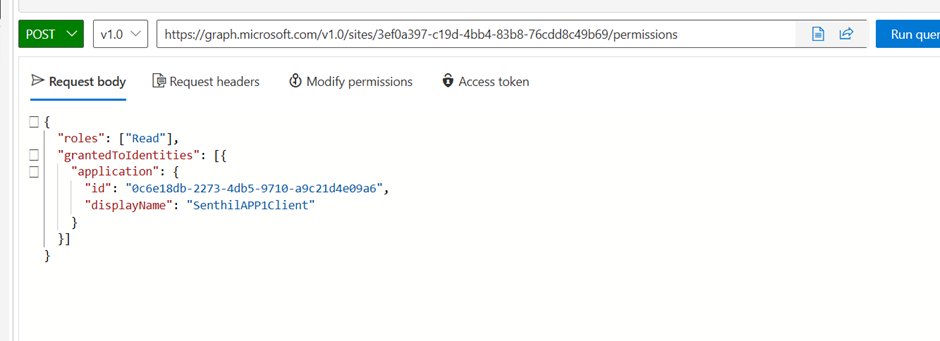
Assign Site Permission
Use this API call to grant permission to the registered App:
Postman
|
POST
https://graph.microsoft.com/v1.0/sites/{site-id}/permissions Authorization:
Bearer {access-token} Content-Type:
application/json Request: { "roles":
["Read"], "grantedToIdentities":
[{
"application": {
"id": "0c6e18db-2273-4db5-9710-a9c21d4e09a6", //{app-id}
"displayName": "SenthilAPP1Client" //"Your App Name"
} }] } |
🔹 Roles Available:
- "read"
→ Read-only access
- "write"
→ Read and Write access
Or Using Graph API Explorer:
1.
Login to graph explorer as administrator.
URL: https://developer.microsoft.com/en-us/graph/graph-explorer
2.
Assing permission to logged in user as full
control.
Go to modify permission tab
Select the “Sites.Fullcontrol.All”

Revoke permission:

Revoke Permission Using Microsoft Graph API
Step 1: List Permissions on the Site
You need to get the permission ID before you can
revoke it.
API Request to List Permissions
GET
https://graph.microsoft.com/v1.0/sites/{site-id}/permissions
Authorization: Bearer {access-token}
Response Example:
{
"value": [
{
"id":
"permission-id-1234",
"roles": ["read"],
"grantedToIdentities": [
{
"application": {
"id": "{app-id}",
"displayName": "Your App Name"
}
}
]
}
]
}
Note the id of the permission you want to revoke (in
this case, permission-id-1234).
Step 2: Revoke the Permission
Once you have the permission ID, you can delete the
permission using the following API call.
API Request to Revoke Permission
DELETE
https://graph.microsoft.com/v1.0/sites/{site-id}/permissions/{permission-id}
Authorization: Bearer {access-token}
Response
You should receive an HTTP 204 No Content status if
the permission is successfully revoked.
Site 1
Site Name : PDES POC
Site URL: https://qnsq.sharepoint.com/sites/PDESPOC/
Site ID: a8208f55-ac5f-4315-bb36-b9af59381474
Site2
Site Name: OHS Deloitte
Site URL:
https://qnsq.sharepoint.com/sites/OHSDeloitte/_api/site/id
Site ID: 3ef0a397-c19d-4bb4-83b8-76cdd8c49b69
Comments
Post a Comment